


10 things any crafty (and non-crafty) bride must consider
This is an awesome blog post by invited blogger, Sylvia Sosa.
I have been anxious to get it out to you! Please like it, pin it, tweet it and share it with other brides!
I love all of that wedding DIY inspiration on Pinterest. I have so many pins and so many boards…. I know, we all look at them and think to ourselves… “I could totally do that!”, “WHY would I pay someone to do that when it really looks so simple…?” “It will be FUN!”.
DIY projects can be very rewarding, or they can be incredibly challenging. A few preliminary steps to consider before embarking on several DIY projects:
1) Identify all of your projects, and their details, 8 months before your wedding, at the latest!This may include: programs, place cards, menus, ceremony doo-dads (parasols, holders for flower petals…), bridesmaids presents, welcome bags, and other wedding favors.
2) Once you’ve identified your projects, identify all the necessary supplies for each and every project (this includes: glue guns, scissors, ribbon, etc.).
3) Make a demo of each project at least 8 months prior: This will help you determine how hard the project is, how much time it takes, how much supplies you’ll need, and the general cost per piece. (You’ll also have something to point to when people keep asking you what you’re doing.)
4) If you decide to go forth, you should find ALL your supplies and order supplies by 7 months before the wedding and start a project as soon as you gather all your supplies. No new project should be conceived within 6 months to your wedding. Why so early?
5) You should finish all of your projects (except potting plants) 2 solid months before your wedding.
6) Try to deliver any DIY projects to your planner as early as possible, depending on what it is, and how much space they have to hold your things. Ideally, all of your large pieces should be delivered 2 weeks before your wedding to the planner. The week of your wedding, particularly if the venue is over an hour away, you will be coordinating friends and family and will not have time to make lengthy road trips.
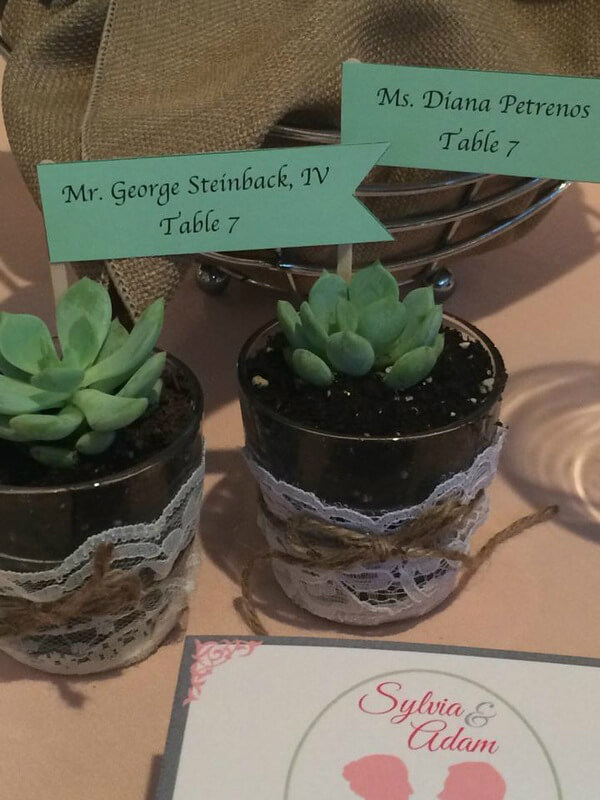
Succulent mini-planters served as a place setting and favor.
A few other things to remember for your DIY projects:
7) Be Realistic: Don’t expect your bridesmaids or family to help. Due to everyone’s time constraints, these projects will likely be your entire responsibility. Don’t take on a large project and assume your friends will help you finish it.
8) Searching online for the best deal can help you save some money and I highly recommend it, but shipping costs can reduce any savings you thought you may have.
9) Have your estimated supply counts and add about 20%. You will thank yourself later. Because at the very least, if your guest list doesn’t grow, and if you don’t break a few pieces, then you will have a few mementos for yourself. That’s important!!
10) If it fits in your timeline, purchase bulk supplies during holidays. Best holiday to save: Black Friday! You’d be surprised how many wedding vendors give major discounts on THIS day of the year. Not that weddings have anything to do with Christmas shopping… just go with it… 😉 I luckily noticed this right away and bought a bunch of key pieces- such as canvas totes, which can be pricey in large quantities at full price.

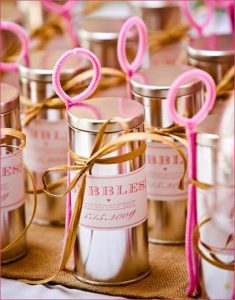
My wedding was this past August, and my completed DIY projects included: Individual succulents in mini-flower pots wrapped in lace and burlap and with typed place cards flags for each guest (120), parasols with fabric flowers for each couple (60), personalized handkerchiefs for each guest (120). It was a destination wedding so I also put together and personalized 60 canvas welcome bags with: a hand-drawn wedding map (not drawn by me) on one side and our names on the other, personalized water bottles, personalized mint tin, personalized “recovery kit”, and personalized candy box in the canvas tote, and then the bridesmaids also got their own personal totes. I did not bother with DIY programs or Menus, because I had to wait until it was too close to the wedding to have them finalized. So, I had them designed on Etsy and printed them locally.
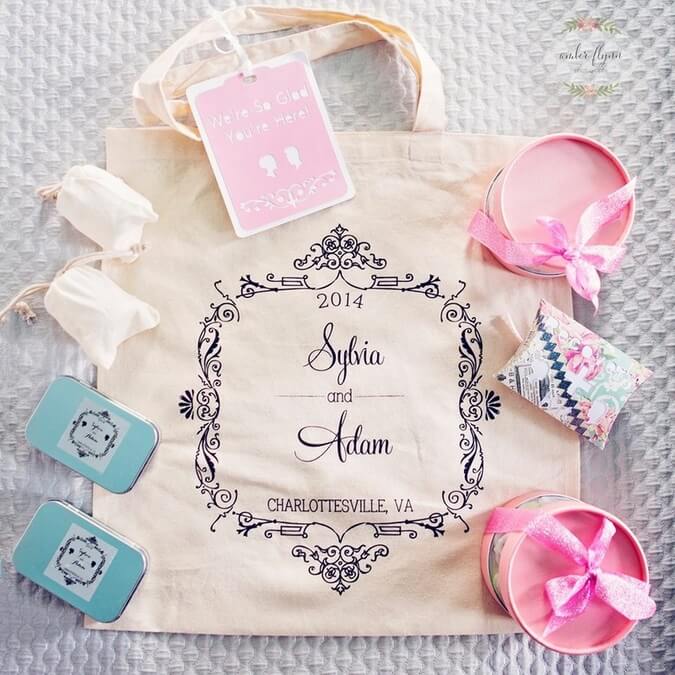
This is the tote bag. I made the label myself, and all the sticker labels, stuffed 120 candy boxes, and folded those paper boxes (recovery kits), then stuffed 60 gift bags, and 14 wedding party bags. Photo credit: www.amberflynnphotography.com
The ‘DIY Projects’ for my wedding were completely worth it to me! I love to hand-make things, I spend hours crocheting baby blankets for friends and family already. So, I enjoyed using my crafty-ness and problem-solving skills to create a set of projects for the special people in my life, who would take time out of their busy schedule to attend my destination wedding… and they come out perfectly!
If you have any questions about your DIY project, you can find me:
